Web UI How-to Guide
Practical recipes for common Web UI tasks.
Connect to a Different Cluster
Using an SSH profile:
Using direct connection parameters:
With a custom SSH key:
SRUNX_SSH_HOSTNAME=slurm.example.com \
SRUNX_SSH_USERNAME=user \
SRUNX_SSH_KEY=~/.ssh/id_ed25519 \
srunx ui
Change the Server Port
By default, the server runs on port 8000. Use the --port option:
Monitor GPU Resources
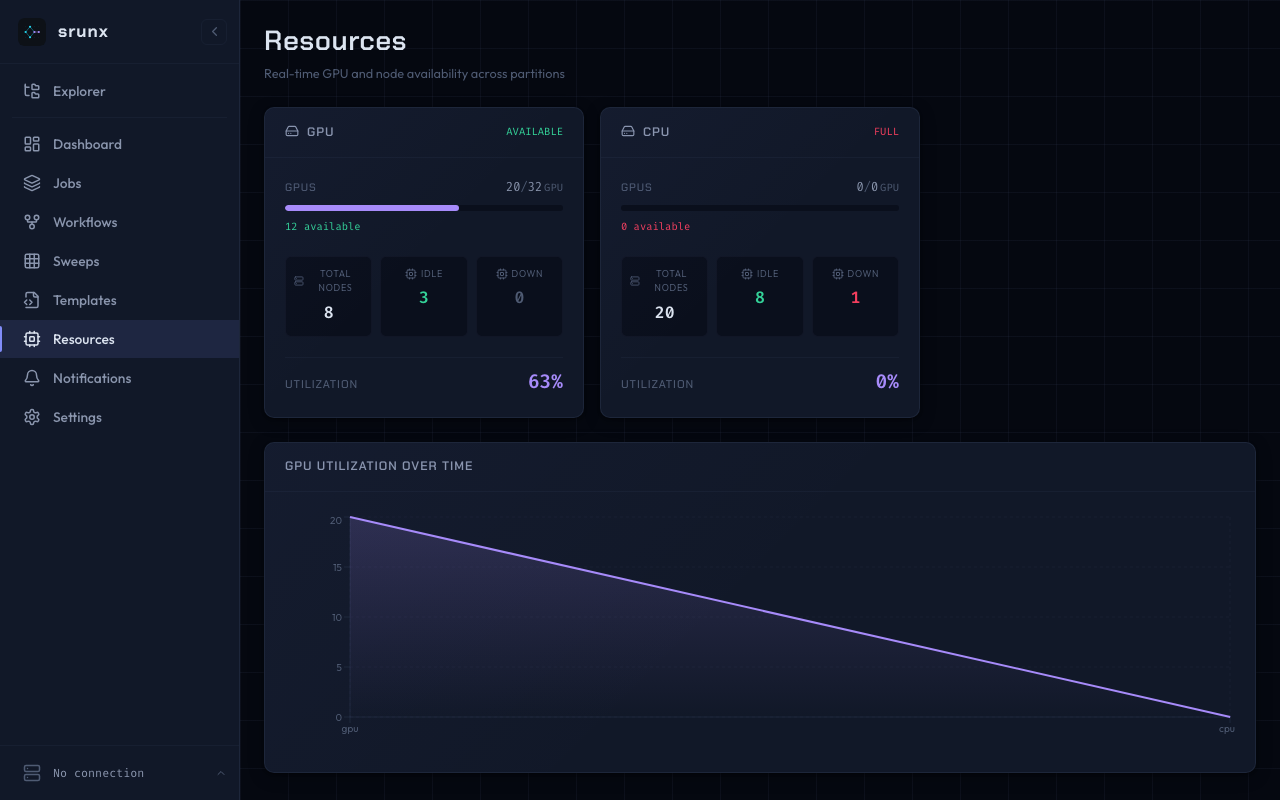
- Navigate to Resources in the sidebar
- Each partition shows:
- GPU utilization bar with color coding (green \< 70%, orange \< 90%, red > 90%)
- Total/idle/down node counts
- Overall utilization percentage
- Data refreshes every 10 seconds via polling
Cancel a Running Job
- Navigate to Jobs
- Find the job in the table (use search or status filter)
- Click the red cancel button (X icon) in the Actions column
- The job will be cancelled via
scancelon the remote cluster
View Job Logs
- Navigate to Jobs
- Click the log icon next to a job
- Switch between stdout and stderr tabs
- For running jobs, logs are polled every 3 seconds
Upload and Visualize a Workflow
- Navigate to Workflows
- Click Upload YAML
- Select a
.yamlor.ymlfile - After upload, click View DAG on the workflow card
- The DAG view shows:
- Job nodes with status badges
- Dependency edges between jobs
- Resource indicators (GPU count, node count)
- Click a node to see detailed job information
- Toggle between DAG and List views using the toolbar buttons
Warning
Workflow YAML files containing python: args are rejected for security reasons.
Use python: args only via the CLI (srunx flow run).
Build a Workflow with the DAG Builder
- Navigate to Workflows and click New Workflow
- Enter a workflow name in the toolbar input (alphanumeric, hyphens, and underscores only)
- Click Add Job to add job nodes to the canvas
- Click each node to open the property panel and configure name, command, and resources
- Drag from a node's bottom handle to another node's top handle to create a dependency
- Click Save Workflow to validate and persist the workflow as YAML
The builder performs client-side validation before submitting:
- Every job must have a non-empty name and command
- Job names must be unique
- The dependency graph must be acyclic (no circular dependencies)
Edit Job Properties
- Click a job node on the DAG builder canvas
- The property panel slides in from the right with these sections:
- Basic — Name, command, work directory, log directory
- Resources — Nodes, GPUs per node, tasks per node, CPUs per task, memory, time limit, partition, node list
- Environment — Conda environment, virtualenv path, environment variables
- Container — Enable/disable container mode with runtime (Pyxis, Apptainer, Singularity), image, mounts, workdir
- Retry — Retry count and delay in seconds
- Changes are applied immediately to the node on the canvas
- Click the X button or click empty canvas space to close the panel
- Click the trash icon to delete the selected job
Use the File Browser for Remote Paths
The file browser lets you pick files and directories from your local project tree, automatically translating them to remote paths.
- Ensure you have at least one mount configured (see Web UI tutorial Step 8)
- In the property panel, click the folder icon next to Command, Work Dir, or Log Dir
- Select a mount from the Project dropdown
- Browse the directory tree by clicking folders to expand them
- Click a file or directory to select it (the footer shows the remote path)
- Click Select to insert the remote path into the field
Note
When selecting a file for the Command field, the path is made relative to the work directory if one is set. This keeps your commands portable.
Manage Mount Points
Mount points define local-to-remote directory mappings for the file browser.
Add a mount:
srunx ssh profile mount add myserver ml-project \
    --local ~/projects/ml-project \
    --remote /home/researcher/ml-project
List mounts:
Remove a mount:
Mounts are stored in the SSH profile configuration. The --local path is the directory on your local machine; --remote is the corresponding path on the SLURM cluster.
Sync Files Before Running
The file browser shows local files, but workflows execute on the remote cluster. Ensure files are synchronized before running.
From the file browser:
- Open the file browser from any path field in the property panel
- Click Sync Now in the yellow banner at the top of the file tree
- Wait for the sync to complete (the button changes to "Synced")
From the command line:
rsync -avz --delete \
    -e "ssh -i ~/.ssh/id_ed25519" \
    ~/projects/ml-project/ \
    researcher@dgx.example.com:/home/researcher/ml-project/
Warning
If you modify local files after syncing, you must sync again before running the workflow on the cluster.
Change Dependency Types
By default, edges use afterok (run only if the upstream job completes successfully). To change the dependency type:
- Click an edge on the DAG builder canvas
- A popover appears with four options:
afterok— Run after successful completion (default)after— Run after the upstream job starts runningafterany— Run after the upstream job ends regardless of statusafternotok— Run only if the upstream job fails
- Click the desired type. The edge updates immediately
Run a Workflow
- Navigate to Workflows and click a workflow card to open the detail page
- Click Run Workflow in the toolbar
- The system identifies referenced mounts by matching each job's
work_diragainst mount remote paths (longest prefix match), then syncs them via rsync - Jobs are submitted in dependency order. SLURM handles scheduling through
--dependencyflags (e.g.,--dependency=afterok:12345) - Status updates appear in the DAG view every 10 seconds. Each node shows the current SLURM state (PENDING, RUNNING, COMPLETED, FAILED)
Note
The run transitions through these phases: syncing (pushing files), submitting (sending sbatch commands), running (polling job statuses), then a terminal state (completed, failed, or cancelled).
Run a Parameter Sweep
Launch the same workflow over a cross-product of arg values without
duplicating YAML files. Every cell runs as an independent workflow_run
under one parent sweep_run.
Open the Run dialog:
- Navigate to Workflows
- On the target workflow card, click the Run button (triangle icon)
Toggle LIST mode on args:
- Each arg row has a SINGLE | LIST toggle on the right
- Switch the arg you want to sweep to LIST
- Enter comma-separated values (for example
0.001, 0.01, 0.1) - Repeat for any additional sweep axes -- the cell count is the cross-product of all LIST args
- A
Sweep: N cells . lr[3] . seed[3]badge appears above the submit button, showing the total cell count and the cardinality of each axis
Configure Advanced options:
- Expand the Advanced section below the args
- Toggle fail_fast to cancel peers on first failure (default: off)
- Set max_parallel (default: 4; required for sweeps)
Submit:
- Click RUN SWEEP (N) where N is the cell count
- The UI navigates to
/sweep_runs/{id}for the new sweep
Track progress on the sweep detail page:
- Progress bar -- segmented by cell status (completed / failed / cancelled / running)
- ETA -- linear estimate based on completed cells; hidden until at least one cell reaches a terminal state
- Draining indicator -- spinner plus "draining pending cells" label while a cancelled sweep finishes up active cells
- Cells table with:
- Status filter dropdown (all / pending / running / completed / failed / cancelled)
- Sortable columns: #, Status, Started, Completed, Duration
- Per-cell cancel x button (shown only for non-terminal cells)
- Click any cell row to drill into
/workflow_runs/{cell_id}for the per-cell DAG view and logs
Note
Sweep submissions always route through the configured SSH adapter via
a per-sweep pool. If no SSH profile is configured, the RUN SWEEP
button is disabled.
Cancel a Running Workflow
- While a workflow is running, click Cancel in the toolbar on the workflow detail page
- All submitted SLURM jobs are cancelled via
scancel - The run status changes to
cancelled
Warning
Jobs that have already completed before the cancel request are not affected. Only PENDING and RUNNING jobs are cancelled.
Edit an Existing Workflow
- On the workflow detail page, click the Edit button (pencil icon) in the toolbar
- Alternatively, on the workflow list page, click Edit on a workflow card
- The DAG builder opens with all jobs and dependency edges pre-loaded on the canvas
- Modify job properties by clicking nodes, add or remove connections by dragging handles, or add new jobs with Add Job
- Click Update Workflow to validate and save the changes
The update overwrites the existing YAML file on disk. The same validation rules apply: unique job names, non-empty commands, and an acyclic dependency graph.
Delete a Workflow
- On the workflow detail page, click the delete button (trash icon)
- Confirm in the dialog that appears
- The YAML file is removed from the workflow directory and you are redirected to the workflow list
Warning
Deletion is permanent. There is no undo. Active runs for the deleted workflow are not affected (they continue to track job statuses in memory), but you will not be able to start new runs.
Manage Mounts from the Web UI
In addition to the CLI, mounts can be managed directly from the DAG builder.
- In the DAG builder, click the gear icon in the toolbar to open Mount Settings
- The modal shows all configured mounts with their name, local path, and remote path
- To add a new mount, fill in the name, local path, and remote path fields, then click Add
- To remove a mount, click the trash icon on the corresponding row
- Changes are saved immediately to the SSH profile configuration (
~/.config/srunx/config.json)
Note
Mounts added through the Web UI are identical to those added via srunx ssh profile mount add. Both methods modify the same configuration file.
View Job Logs from a Workflow Run
- During or after a workflow run, click a job node in the DAG view
- The sidebar shows job details including the SLURM job ID and current status
- Click View Logs to see stdout and stderr output
- For running jobs, log content is polled and refreshed automatically
Run Without SSH (Frontend Only)
For frontend development or demos, the server can start without an SSH connection:
If no SSH profile is configured, the server starts with a warning:
No SSH configuration provided. Set SRUNX_SSH_PROFILE or
SRUNX_SSH_HOSTNAME + SRUNX_SSH_USERNAME to connect to a SLURM cluster.
SLURM endpoints will return 503 Service Unavailable, but the frontend loads normally.
Develop the Frontend
For frontend development with hot-reload:
# Terminal 1: Start the backend
srunx ui

# Terminal 2: Start the Vite dev server
cd src/srunx/web/frontend
npm install
npm run dev
The Vite dev server runs on http://localhost:3000 and proxies API requests to the backend on port 8000.
Run Tests
Backend tests:
Frontend E2E tests:
Frontend type check: